Posted on 26 June 2026
Author: Maisy owens
Last updated on 26 June 2026
The Smart Way to Install Connectable Garden Lighting
Creating professional-looking garden lighting no longer requires trenching mains cable or hiring an electrician. EasyFit is a modular, low-voltage connectable lighting system designed specifically for UK homeowners who want safe, scalable and permanent outdoor lighting without the complexity of hard wiring.
This guide explains exactly how to plan, size, install and expand an EasyFit system with confidence. You’ll learn how to calculate transformer capacity, design your cable layout properly, automate your setup and avoid the common mistakes that cause most DIY lighting problems.
If you want lighting that grows with your garden rather than limiting it, this is where to start.
Choose the Right EasyFit System for Your Garden
Before buying fittings, step back and assess your space. The right system isn’t just about how many lights you want today, it’s about how your garden will develop over time.
Consider:
- Garden size and layout – Is it a compact courtyard or a long lawn with deep borders?
- Lighting goals – Are you focusing on ambience, security, or both?
- Future landscaping plans – Will you add decking, planting beds or features later?
- Power access – Where is your outdoor socket located?
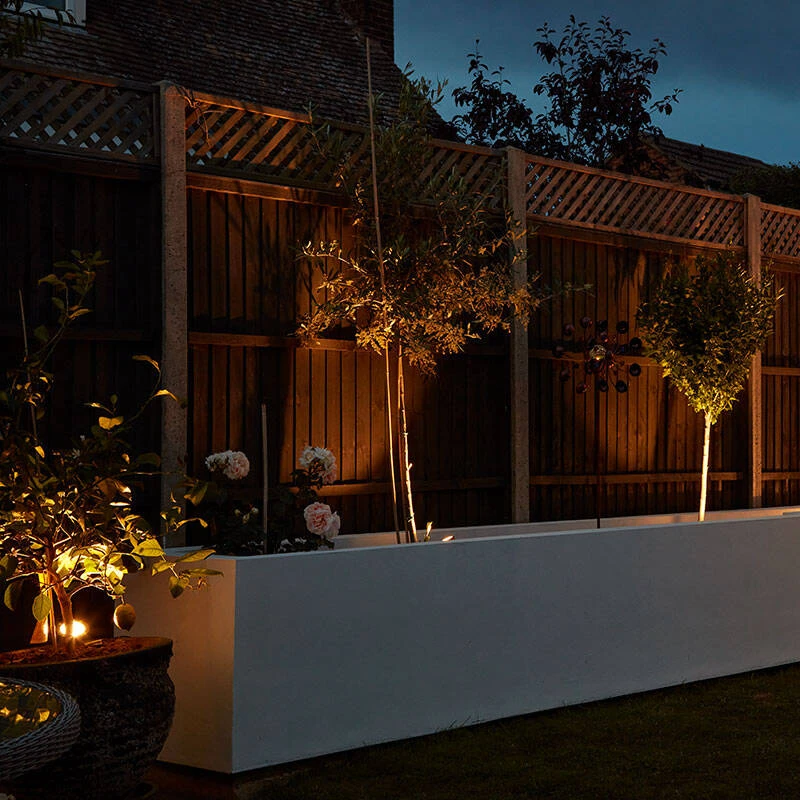
A small patio garden may only require pathway lights and one or two feature spotlights. A larger garden might combine tree uplighting, step lighting, border accents and security zones.
Thinking ahead now prevents replacing transformers or reworking cable layouts later.
Calculate Your Power Requirements Before You Buy
Transformer sizing is where most beginners go wrong. It isn’t the most exciting part of planning – but it’s critical.
Choosing the wrong transformer leads to flickering lights, overheating and restricted expansion. Correct sizing ensures stable performance for years.
Add Up the Wattage of Each Fitting
Every EasyFit fitting has a stated wattage. This tells you how much power it draws from the transformer.
To calculate your load:
- List every fitting you plan to install.
- Note the wattage of each.
- Add them together.
Example:
- 4 × 3W spotlights = 12W
- 2 × 2W pathway lights = 4W
- 1 × 6W feature spotlight = 6W
Total load = 22W
This number represents your minimum requirement – not the transformer you should automatically buy.
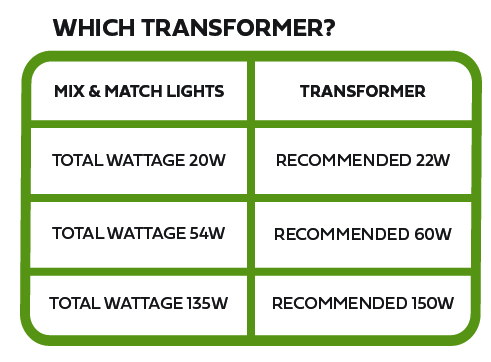
Select the Correct Transformer
EasyFit systems typically offer three common capacities:
- Suitable for small courtyard or patio areas
- Supports around 4–6 low-wattage fittings
- Best for contained layouts with no expansion plans
- Ideal for most average UK gardens
- Supports layered lighting schemes
- Provides comfortable headroom for future additions
- Designed for large or multi-zone gardens
- Suitable for 12+ fittings depending on wattage
- Ideal for phased landscaping projects
A simple rule: if your calculated load is close to the transformer’s maximum rating, move up one size.
A 22W calculated load should generally use a 60W transformer. This prevents strain and leaves room for growth.
How Many Lights Can I Connect?
The limit depends on total wattage – not the physical number of fittings.
Best practice is to operate at no more than 70–80% of transformer capacity.
Example:
- 60W transformer
- Safe operating load: approximately 45W
- If each fitting is 5W, you can run around 9 fittings (9 × 5W = 45W)
Leaving headroom reduces thermal strain and prevents cut-outs.
Avoid Overload and Voltage Drop
Two technical issues matter in low-voltage systems:
Overloading occurs when total wattage exceeds transformer capacity. Symptoms include dimming, flickering or shutdown.
Voltage drop happens over long cable runs, where brightness weakens across distance.
To prevent voltage drop:
- Avoid excessively long single cable runs
- Use branching connectors to distribute load
- Position the transformer centrally when possible
In deeper gardens (20m+), consider splitting the system into zones to maintain even brightness.
Install EasyFit Safely and Correctly
EasyFit is designed for DIY installation, but correct setup protects your investment.
The Five-Step Setup
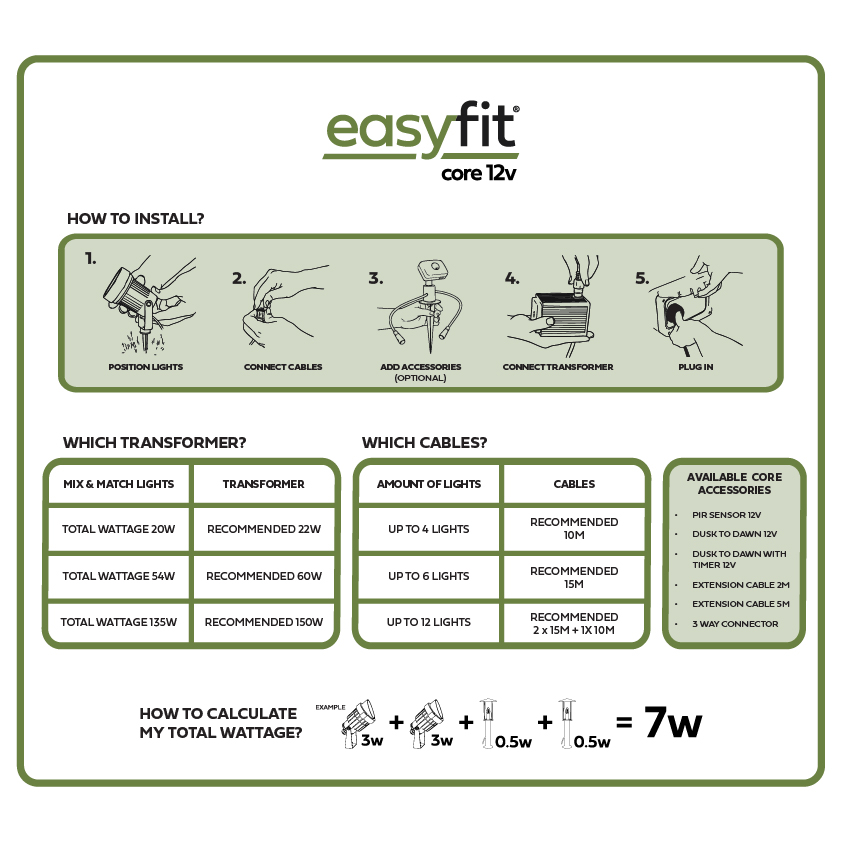
Step 1: Position Your Lights
Start by placing your lights exactly where you want them in your outdoor space. This could be along a pathway, around a patio, in flower beds, or highlighting key garden features.
We recommend laying everything out first (without securing them permanently) to check spacing and overall effect before connecting.
Step 2: Connect the Lights to the Main Cable
Once you’re happy with the layout, connect each light to the main EasyFit cable.
- Simply attach each fitting to the cable using the EasyFit connectors.
- You can connect multiple lights along the same cable.
- The system is designed to be quick, secure and DIY-friendly, no electrician required.
Continue adding lights along the cable wherever needed, as long as you stay within the transformer’s wattage limit (see Step 4)
Step 3: Add Any Accessories
If you’re using accessories, now is the time to connect them.
Popular accessories include:
- Dusk to Dawn Sensor – Automatically turns your lights on at night and off in the morning.
- PIR Sensor – Activates your lights when motion is detected.
These simply connect inline within your EasyFit system, making it easy to customise how your lighting operates.
Step 4: Connect to the Transformer
Next, connect your main cable to the transformer. The transformer powers your lighting system and must be matched correctly to your total wattage.
Step 5: Plug In and Enjoy
Finally, plug your transformer into the mains power supply.
Your EasyFit outdoor lighting system is now ready to go – sit back and enjoy beautifully illuminated outdoor spaces with minimal effort.
Plan Your Cable Layout Like a Lighting Designer
Good lighting starts below the surface. Professional landscape designs always begin with infrastructure planning.
A well-planned cable layout:
- Improves reliability
- Simplifies expansion
- Keeps the garden looking intentional
Start with the Main Cable
The main cable is your backbone.
Before installing fittings:
- Sketch your garden layout.
- Mark each light position.
- Count how many connection ports you’ll need.
If your cable has six ports and you need eight fittings, you’ll require either a longer cable or branching connectors.
Position the transformer first. Ideally, it should sit centrally to avoid pushing all cable length in one direction.
Lay cables loosely before securing anything permanently.
Use Extension Cables Strategically
Extension cables help maintain balance.
Instead of stretching one long run to the far corner, consider:
- Running the main cable through the densest lighting area
- Using extension leads to reach isolated features
- Splitting the layout into two directions from the transformer
This reduces strain and improves brightness consistency.
Add Three-Way Connectors for Branching
Gardens rarely follow straight lines.
Three-way (T) connectors allow branching into separate zones:
- Pathway lighting
- Feature tree lighting
- Patio or decking illumination
Branching shortens cable runs and keeps the layout tidy.
When installing:
- Tighten seals fully
- Avoid water pooling areas
- Leave small service loops for repositioning
Hide Cables Without Deep Trenching
EasyFit operates at 12V low voltage, meaning deep trenching is generally unnecessary.
To keep installations discreet:
- Tuck cables beneath mulch or gravel
- Lay along fence lines or edging strips
- Shallow bury a few centimetres below soil
- Avoid crossing open lawn areas
If crossing pathways, run cables beneath slabs or inside conduit for protection.
Can EasyFit Cables Be Buried?
Yes, shallow burial in soil or mulch is suitable for most domestic gardens.
Avoid:
- Permanently waterlogged areas
- Deep burial without protection
- Running beneath lawn areas prone to digging or aeration
Because the system operates at low voltage after the transformer, it is designed specifically for safe outdoor garden use.
Avoid the Most Common EasyFit Mistakes
Most issues stem from planning shortcuts rather than faulty products.
Overloading Transformers
Always recalculate wattage before adding fittings. Operate at 70–80% capacity.
Mixing Incompatible Systems
Low-voltage lighting systems are typically proprietary ecosystems.
Mixing brands can cause:
- Connector mismatch
- Voltage inconsistency
- Compromised weather protection
- Voided warranties
Stick within one system architecture unless compatibility is confirmed.
Coastal Corrosion Oversight
Properties within approximately 15 miles of the coast face higher salt exposure.
Salt accelerates corrosion in metal components.
In coastal zones:
- Choose corrosion-resistant finishes
- Consider marine-grade stainless steel
- Inspect fittings periodically
Material choice affects lifespan as much as layout.
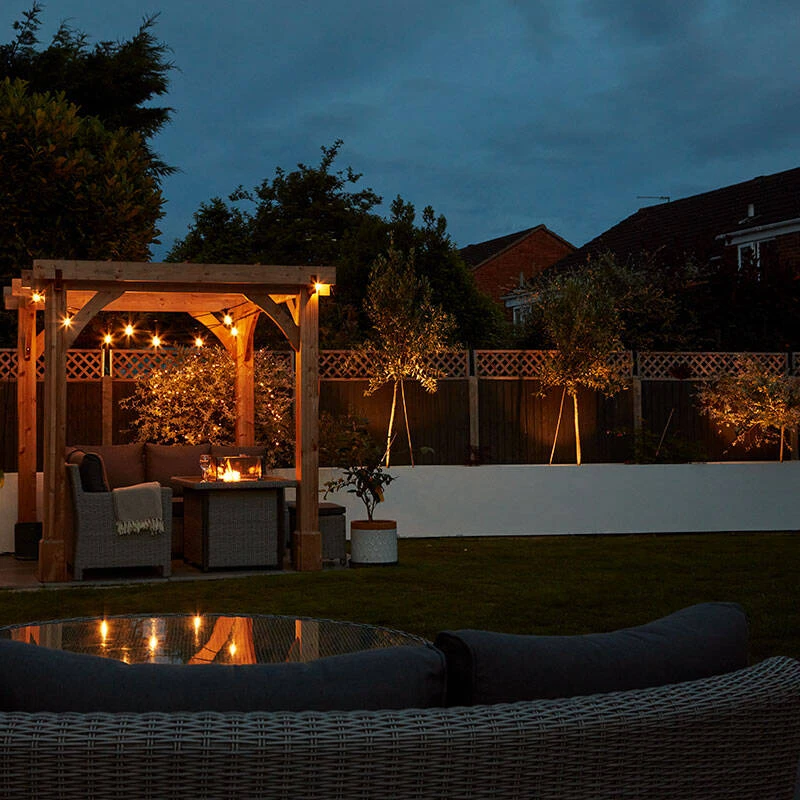
Over-Lighting the Garden
More light does not mean better design.
Professional schemes rely on contrast:
- Highlight key trees
- Illuminate primary pathways
- Select one or two feature areas
Allow shadow to exist. It adds depth and atmosphere.
Restraint often looks more expensive.
Protect Cables from Damage
To maximise longevity:
- Keep cables off open lawns
- Shallow bury where appropriate
- Elevate connectors slightly above soil
- Use conduit in high-traffic areas
Leave accessible slack near the transformer for future adjustments.